Craft Booth Designs and Layouts
Here are several popular ways to set up your booth. Which is right for you?
When you're exploring booth designs for craft shows, one of the fundamental choices you'll need to make is the general layout you will use.
Although there's room for variety within each category, there are four standard layouts you'll find in most booths. Each option has its own set of pros and cons to consider.
Below, you'll see illustrations of several common craft booth designs, as well as a discussion of some of the strengths and weaknesses of each booth style to help you plan your own effective display and decide which configuration is best for you.
I earn a commission for purchases made through links on this page.
To learn more, please see my disclosure.
Understanding the Booth Designs Diagrams
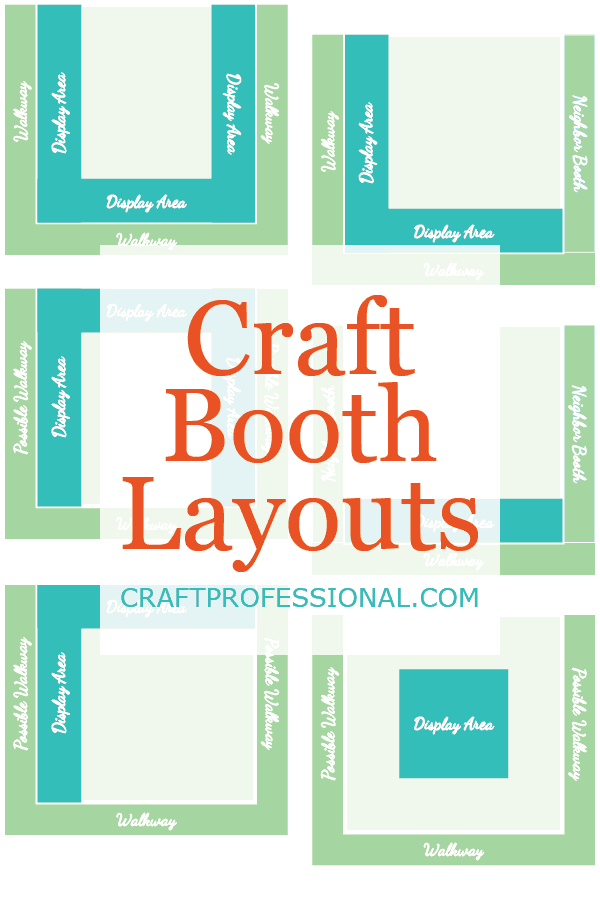
The booth diagrams are drawn as though you have a bird's-eye view of them, that is, you're looking straight down. The back of the booth is always at the top of the image.
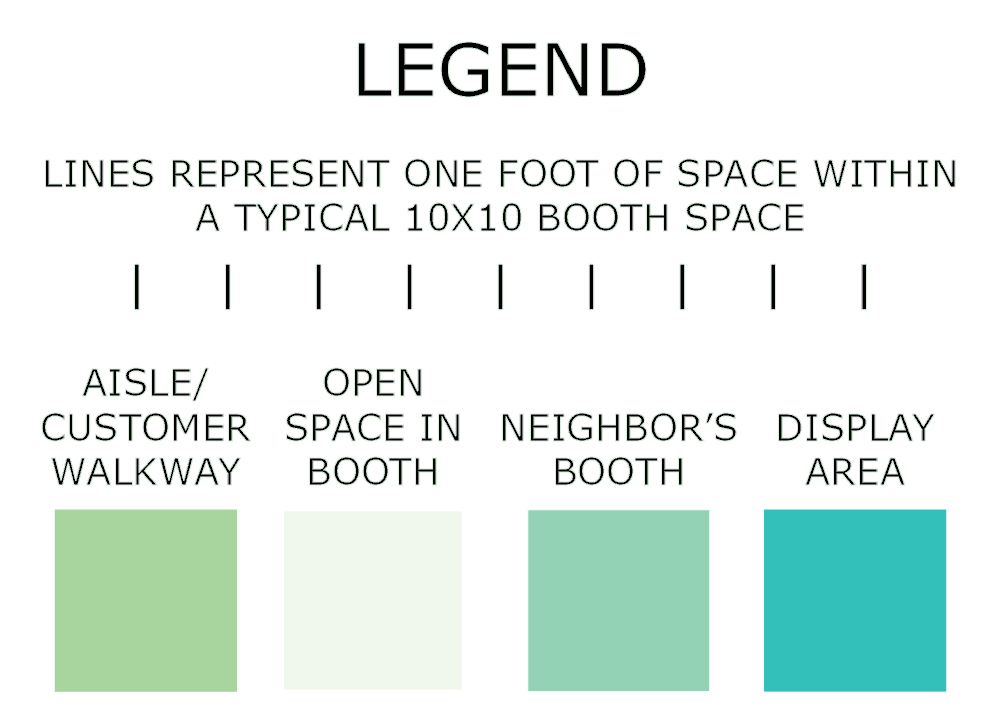
Before we dive in to the booth designs, take a quick look at the legend below. In each diagram, I've used different colors to represent main areas in a booth. The legend explains the color scheme and will help you understand what you're seeing in each booth diagram.
Front Counter Craft Booth
Displays are at the outside edge(s) of your space. Customers browse around the outside of your booth space.
A front counter configuration has your display surface along the front of your booth space. In this type of booth design, you'd most likely be using portable folding tables as your primary display furniture.
You would stand behind the table, while customers stood in front of the table. Alternatively, you may stand in front of the booth if space allows.
There are a few ways to design your booth so your products are displayed at the outside edge(s) of your space depending on the number of sides with open aisles you have in your space.
A front counter style booth will provide you with a lot of space for storing additional items not on display and any tools and supplies you require. It can grab customers' attention quickly because your products are all displayed right up front and close to the aisles.
If you're not careful, front counter booth designs can act as a barrier between you and your customer, and it can limit the type of interactions that can help you to make sales. However, this design doesn't have to limit your interactions. I've seen experienced craft artists do a fantastic job of chatting with customers while behind a front counter style booth. If you're naturally outgoing, it may not be an issue for you. If you're more introverted, and you find talking with customers difficult, this booth layout might make that job even tougher for you.
You may find this booth style harder to monitor for theft, particularly if you make smaller items because your sight lines may be limited and there will be a barrier between you and the customer. If you're helping a customer at the front of your booth, it would be quite easy for someone else to grab an item displayed at the side of your booth without you ever noticing.
If you use this booth style, you'll also be limited in your ability to protect your products from rain or wind on bad weather days. If you use the U or L shaped setup, you won't be able to put up sidewalls without hiding a big part of your display. If you just have a counter across the front of the space, you can put up sidewalls, but your products will still be at the outside edge of your tent, so they won't be getting full protection from your canopy, and customers won't be able to get under your craft tent to escape the weather.
This layout has limitations if you do shows in which tents are lined up close together, and only the front of your booth is open. In those cases, you won't be able to display items along the sides of your booth.
Modular display furniture that can be arranged in a variety of configurations can help, allowing you to create a U shaped front counter design at shows that allow for that, and create a different layout at shows in which booth spaces are closer.
For example, if you use tables for your display, two 2 foot by 4 foot folding tables will provide more flexibility than one 2 foot by 8 foot table, allowing you to work better within the space you're given at any show.
Front Counter Craft Booth - U-Shaped
If you're fortunate enough to have a booth with the front and both sides open to foot traffic, you can create counters for display on all three sides of your booth, leaving the back open for storage, other necessities, and a seat for you.
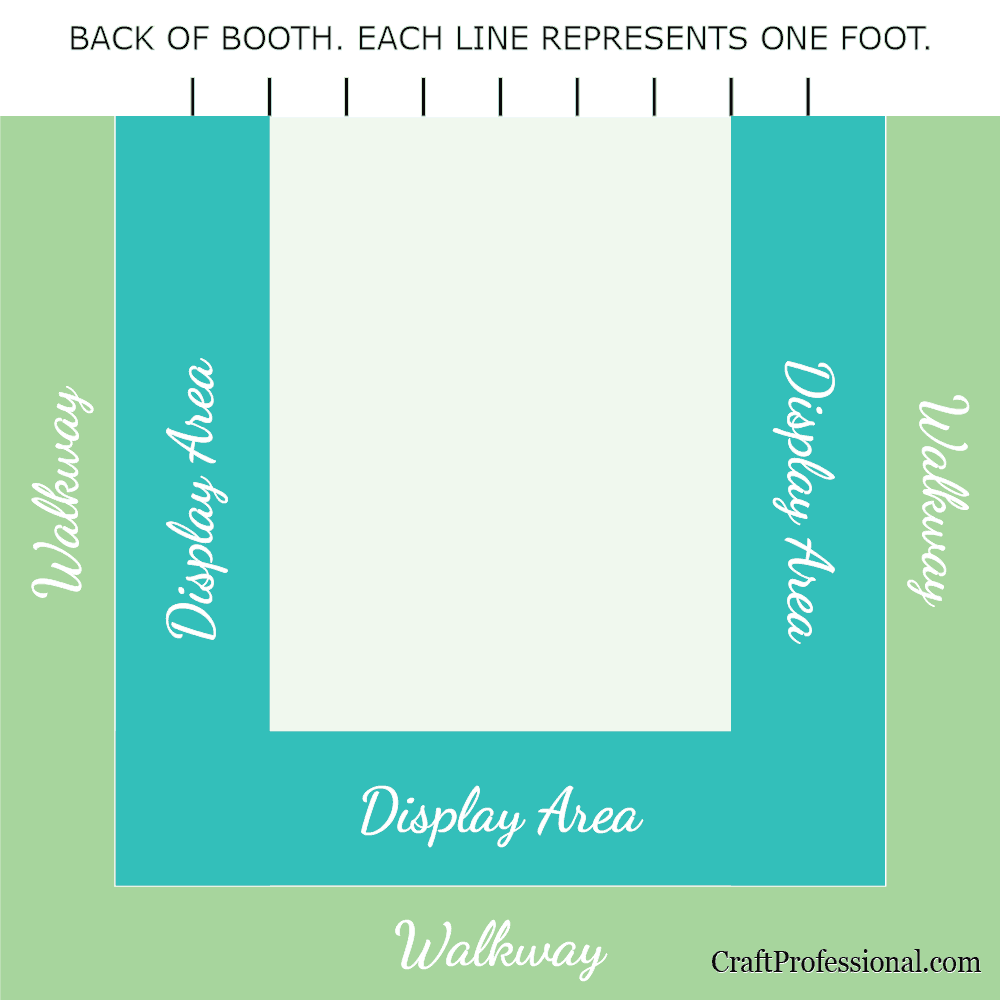
In addition to having a table across the front of your booth, you may also place tables along both sides of your booth.
Ideally, items should be displayed at counter height (36 inches) or slightly higher.
Standard tables are 30 inches high, and should, therefore, be raised a few inches. You can buy adjustable height portable tables that are perfect for craft shows, or you could use standard-height tables with shims in the legs if they are hollow or PVC tubes over the legs to raise the height.
Ideally, tables should be counter height no matter what layout you choose because that height is easier to browse, but, using tables that are a good height for browsing is particularly important for front counter style booth designs.
Front Counter Craft Booth - L-Shaped
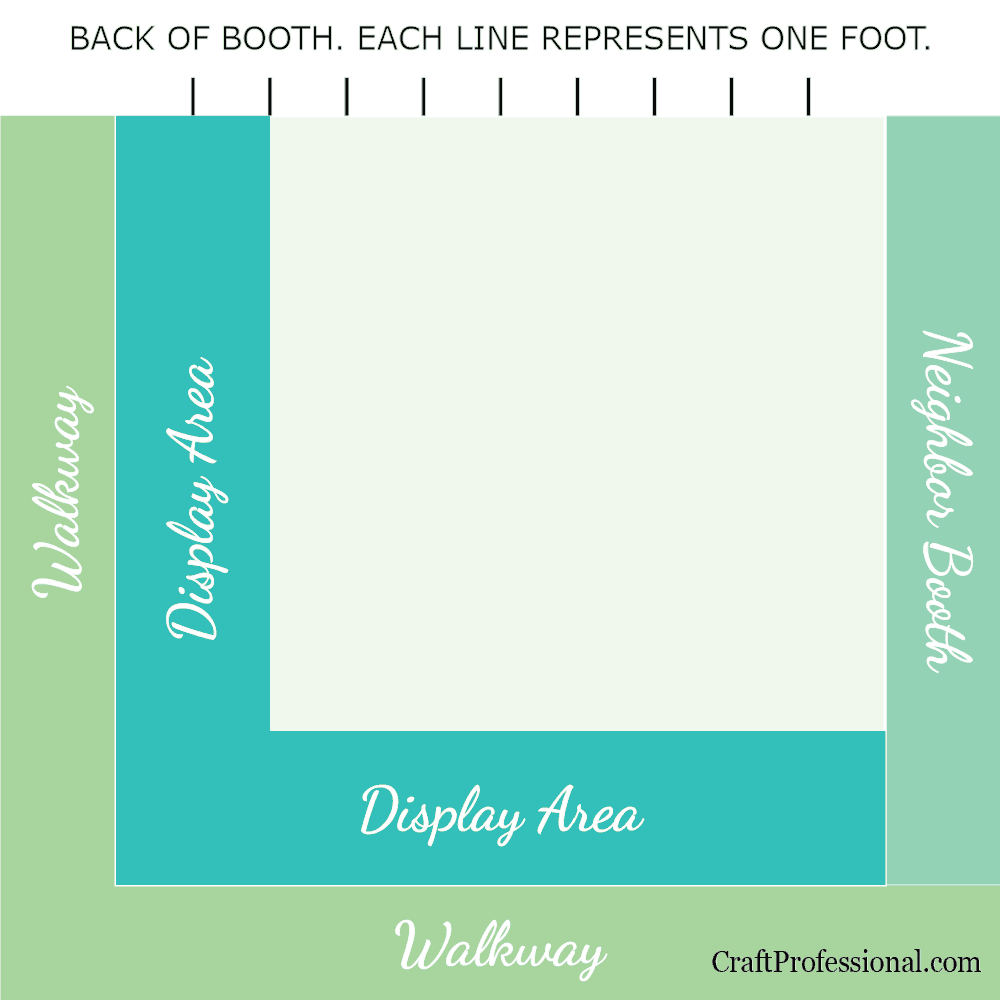
If you have the front of your booth, plus one side open to foot traffic, you can create an L-shaped booth, which allows space for browsing at the front and two sides.
Front Counter Craft Booth - Front Only
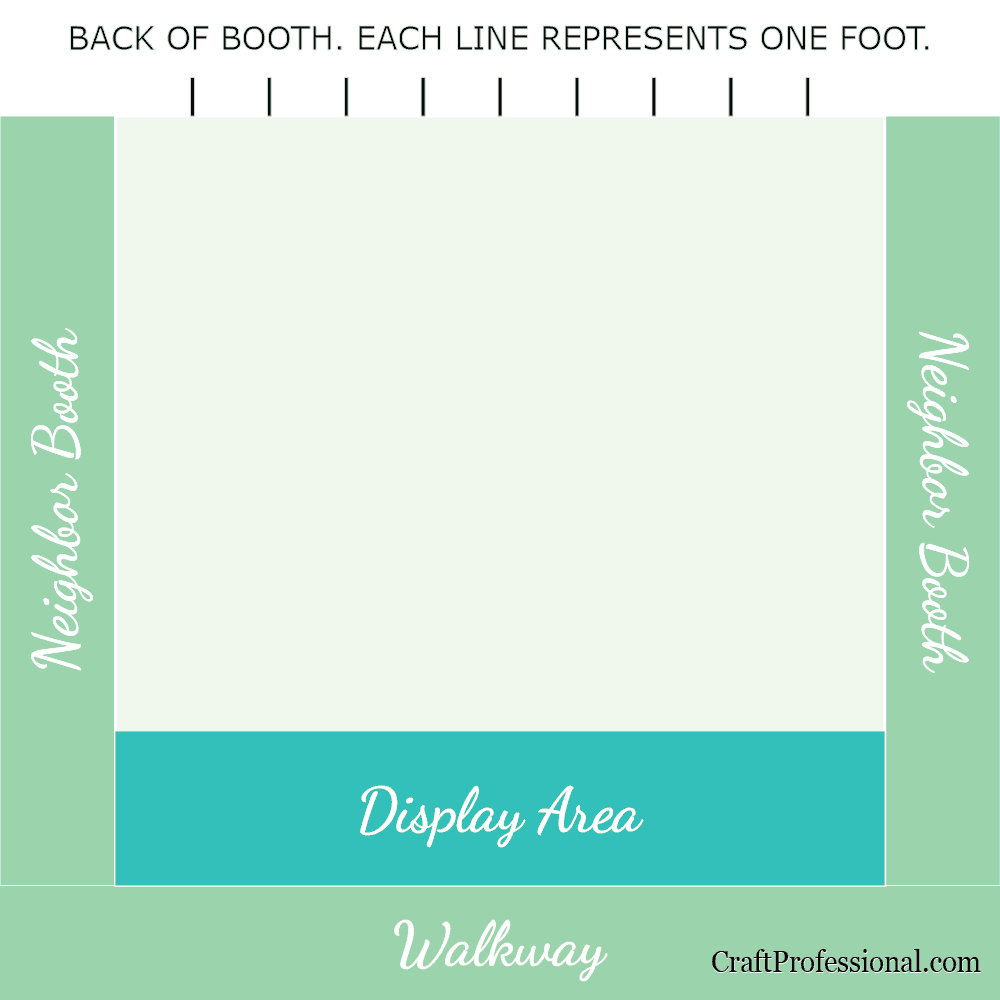
If you want to use a front counter layout, but your booth will be surrounded by neighbors on both sides, your display space will be limited to the front 10 feet only. This display style effectively get your products near customers who are browsing along the aisles; however, it doesn't make full use of your space. That might be fine if you make smaller items, like jewelry. It might even help to make your booth appear more full and complete if your products don't take up a lot of display space and you struggle to fill a booth. However, you'll likely find this layout too limiting if you make larger items that require more space to display.
Browsing Within Your Booth Space
Displays are inside your space. Customers browse within your booth space.
These booth designs take better advantage of the protection of your tent, and they provide more options for using different types of display furniture. In the images below, I have illustrated the booth designs using two foot wide tables, but you can put anything you like in that space.
You will need to be aware that in this display layout, your products aren't front and center, and you will have to work a bit harder to ensure your display grabs customers' attention and draws them into your booth. Many people solve this issue by displaying their more impressive and eye-catching products at the front corner of their booth. For example, a clothing designer may use a mannequin in this space.
Customers Inside Your Booth Space - U-Shaped Display
If you want to bring customers into your space, one option is a U-shaped booth. In this layout, you will arrange your items along the back wall and along two side walls of your space leaving the front open so customers can walk into the space.
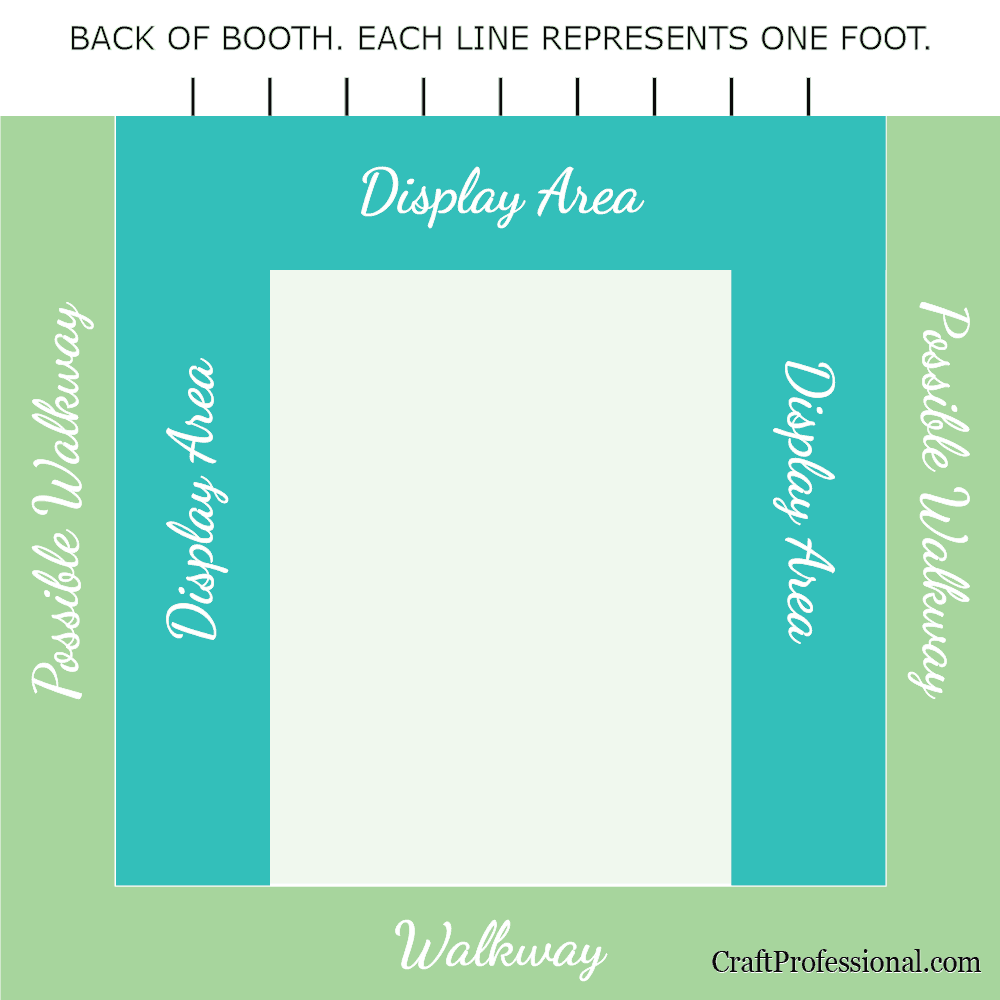
This style provides a lot of display space for your items, and it allows you to interact with customers. Your products and your customers will be sheltered from the elements when you use this layout at outdoor shows. You can put up sidewalls to protect yourself, your products, and your customers from the weather if necessary.
It is important to be very careful to ensure your U-shaped booth does not become too crowded. Using three of your walls for display can make for a cramped booth, particularly if you display your items on tables.
This layout is typically better suited to using slatwalls, gridwall panels , or narrow shelves as a display surface.
If you use standard-width 30 inch tables in a 10x10 U-shaped booth, your tables will take up 5 feet of the width of your booth, leaving only 5 feet of space for customers, which is not a lot of space.
If your items are large and cannot be safely displayed on a narrow surface, this booth style may not be the best option for you.
Items can become lost and difficult to see all the way at the back of your booth. Be sure to put some of your most enticing items at the outer edges of your display to draw customers further into your booth. If your items are small (like jewelry) consider using extra large photos of your work hung where they are easily seen to draw people in to your booth.
Customers Inside Your Booth Space - L-Shaped Display
An L-shaped booth design involves displaying your items along the back wall and one side wall of your space arranged so customers enter your booth space and browse from there. The front and one side wall are left clear.
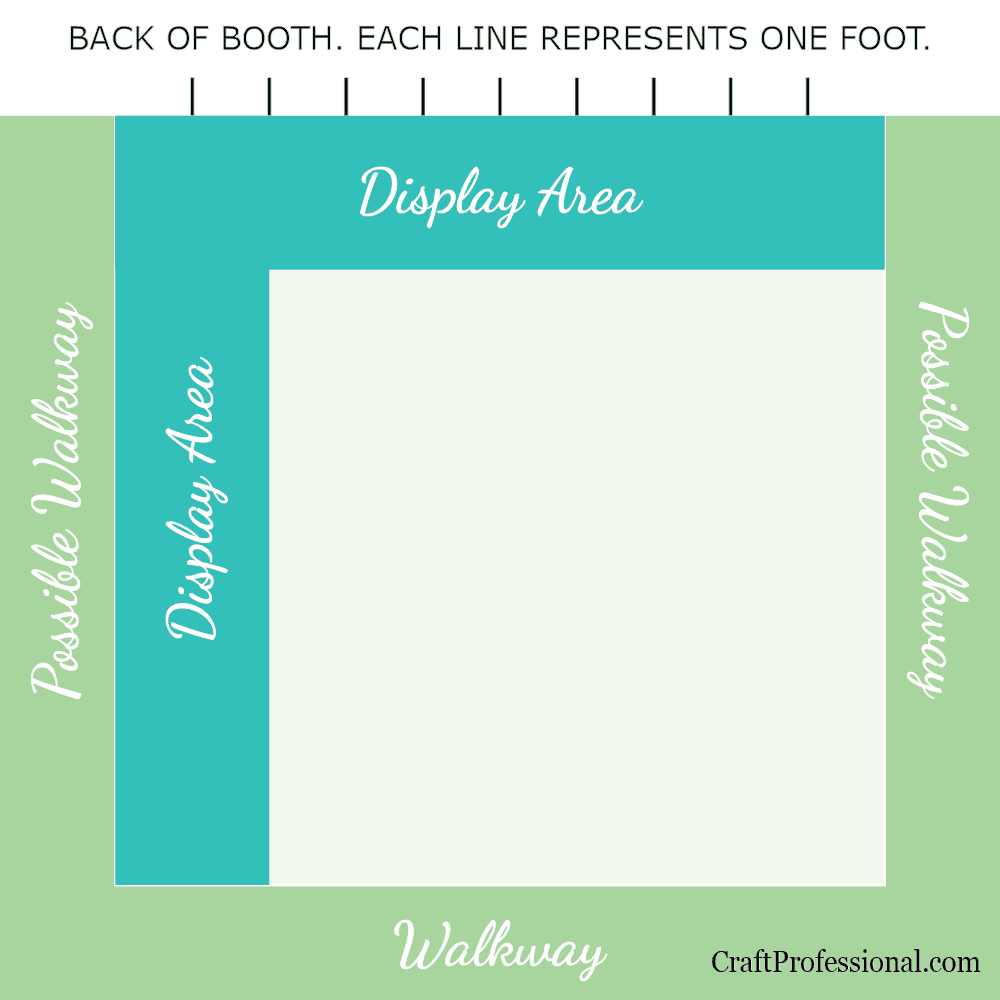
Many of the considerations that apply to U-shaped booth designs also apply to L-shaped configurations. L-shaped booth designs provide a good amount of display space for your items, and you can make good use of the full height of your space. You do need to ensure items don't become lost along the back wall.
This layout allows you to interact freely with customers, and it provides your products and your customers with shelter from the elements.
Crowding is less of an issue with an L-shaped configuration because you've left one wall free. With this setup, you may choose to use portable tables, slatwalls or gridwall panels, or narrow shelves for your primary display surface.
Even with an L-shaped booth, you'll want to be sure to use the most narrow tables or shelves that will allow you to safely display your items while providing plenty of room for customers in your booth.
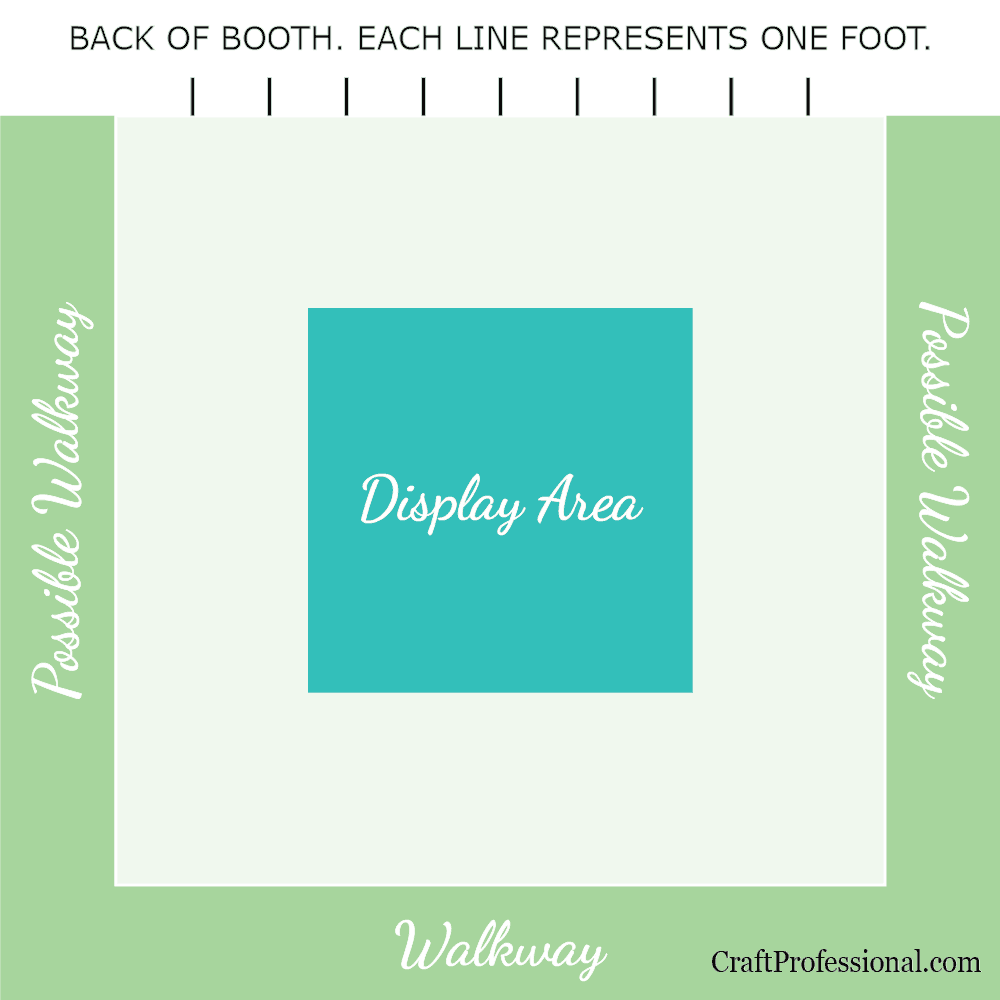
Island Craft Booth
An island booth sits in the middle of your display area with all four outside walls open. It's a less common display setup and can be tough to pull off. I've seen this booth design most in food displays with samples arranged all around the island.
The island doesn't provide a lot of display space, so many who use this configuration buy a double booth space at shows, which adds to their expenses but may be worthwhile if providing a large counter for people to freely sample foods boosts your sales significantly.
Island Booth in Double Booth Space
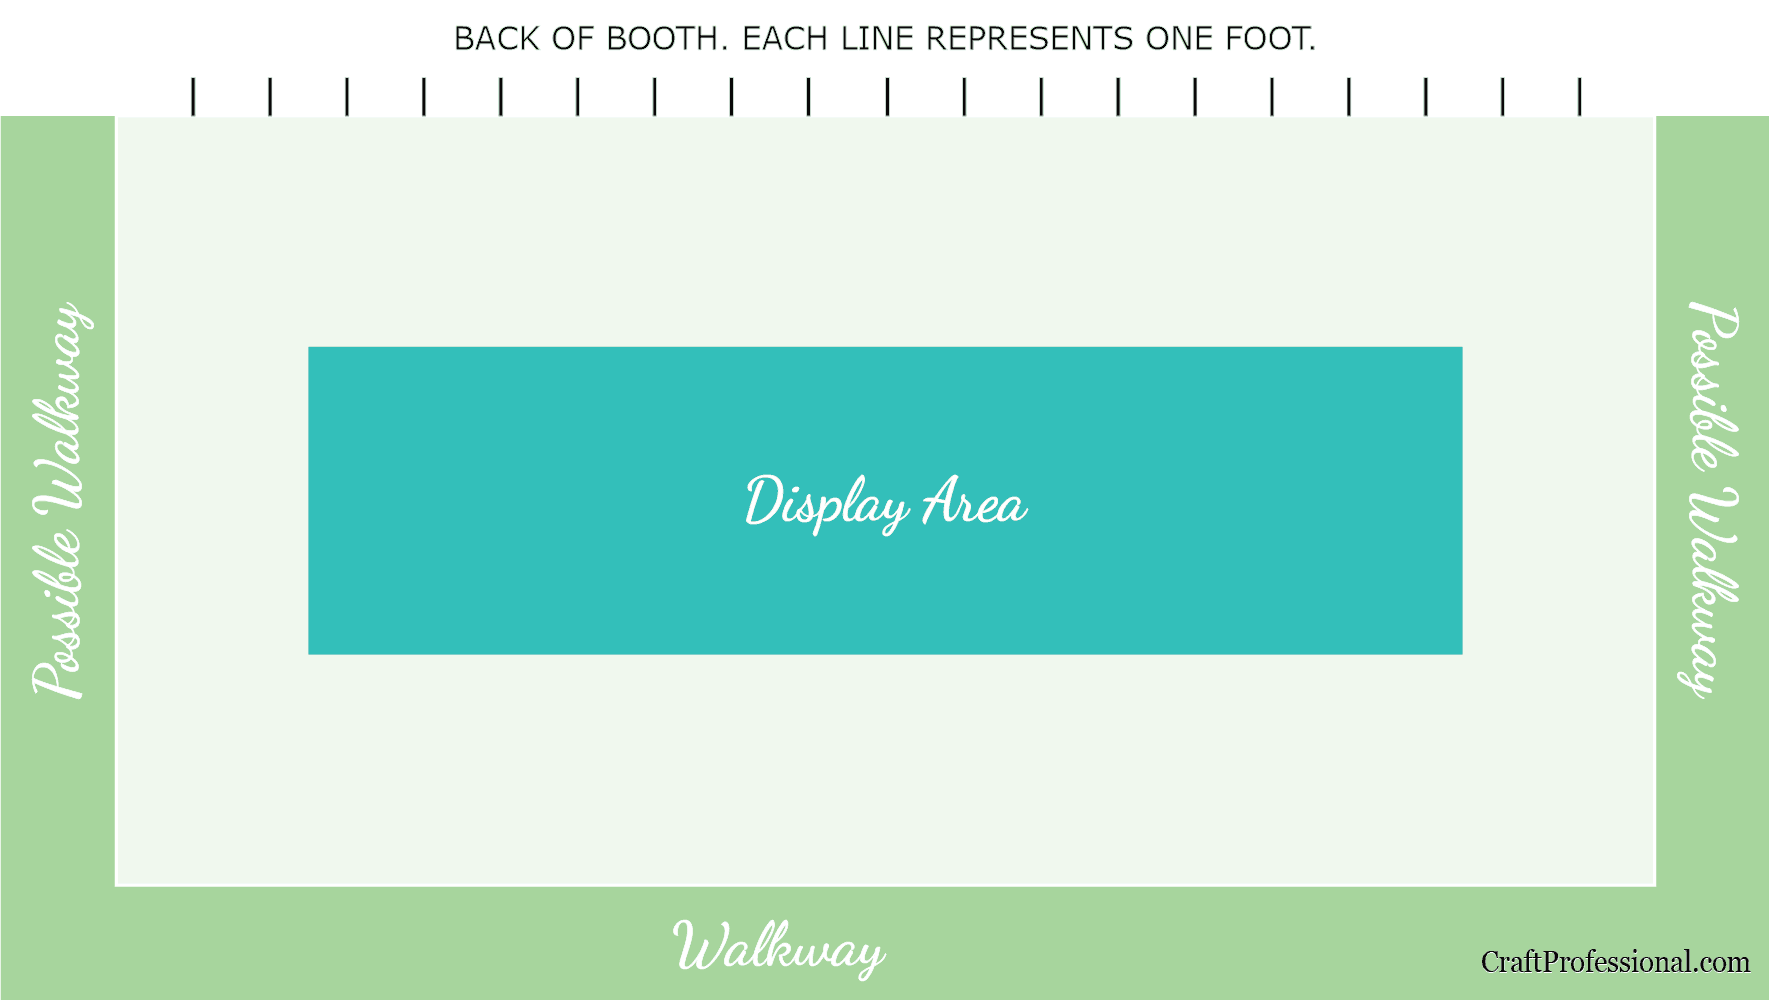
An island style booth is probably the least common configuration because it only works in a small number of circumstances.
You may set up this layout so customers flow around all four sides of the island. Alternatively, you may leave the front and two sides open to customers, while you stand behind the island.
This setup is related to the front counter setup, but because the counter space is more open and set back in your space, it allows for more customer interaction and pulls customers into your space and off the aisles.
One common use of this booth design is by exhibitors selling homemade jams, jellies and sauces. It allows a large number of customers to get close to and sample items while providing good flow of traffic around the booth.
Printable Signs for Your Craft Booth
Communicate better with your customers! I've designed a series of printable craft booth signs you can use to encourage your customers to treat themselves, support small businesses, or shop handmade. You can see them all in my Etsy shop.


New! Comments
Have your say about what you just read! Leave me a comment in the box below.