Belly Casting Tutorial
Pregnancy belly casting is a fun and easy way to create a beautiful memento of your pregnancy.
Now it's possible to buy kits with all the supplies, but when I was pregnant with my first son, pregnancy these kits weren't readily available, so we just bought a couple of rolls of Activa Rigid-Wrap Plaster Cloth, which is gauze impregnated with plaster.
I earn a commission for purchases made through links on this page.
To learn more, please see my disclosure.
Belly Casting Supplies
You can buy a pregnancy belly cast kit that comes with everything you need to create a special pregnancy keepsake. It's quite affordable and comes complete with instructions.
A kit is probably the simplest way to get all of the supplies you'll need. Also, if you wanted to give belly casting supplies as a gift to an expectant mom, the kit would make a much nicer presentation.
I made my belly cast a few years ago. At the time, affordable kits weren't readily available, so I just bought all of the supplies separately.
If you'd like to buy your belly casting supplies separately, here's what you'll need:
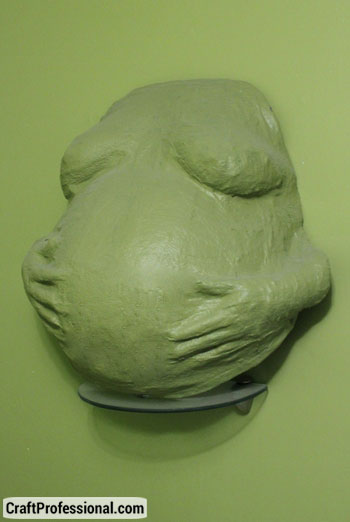
 My belly cast
- plaster impregnated gauze. You'll likely need 3-4 rolls depending on the size of the area your want to cast.
- petroleum jelly
- drop cloth or newspapers to protect your floor
- bowl of water
- scissors
- sandpaper
- gesso for priming the belly cast before you paint
- paint (or other supplies) for decorating
Belly Casting Instructions
Keep in mind, pregnancy belly casting is a two person job, and the pregnant person must be very comfortable with the person who is applying the gauze.
1. Protect your floor with newspapers or a drop cloth
No matter how careful you are, making a belly cast is a messy job. Be sure to protect your workspace before you get started.
2. Make sure the expectant mom is comfortable and prepared to sit or stand still for about thirty minutes.
The expectant mom may sit or stand for this project.
Keep in mind, belly casting is typically done around weeks 36-38 of pregnancy, and standing for any length of time can be uncomfortable at this point in pregnancy.
Even though it was uncomfortable, I stood when we made my belly cast because it seemed to be the best way to get the shape I wanted.
If the mom plans on sitting, use a chair that will wipe clean easily, and protect it with a drop cloth.
3. Decide which body parts you're going to cast.
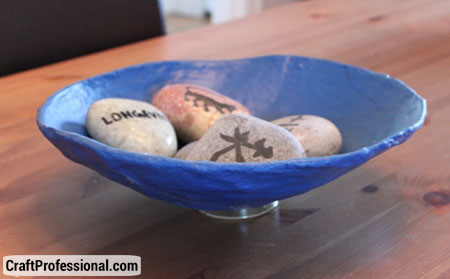
Some people cast the belly only. We did a belly-only practice run, and it turned out to be a very nice bowl.
You may also cast the entire torso, and you may or may not decide to include hands on the mom's belly.
Belly Cast Bowl
 My belly cast bowl
You don't have to cast a full torso. If you prefer something smaller, consider making a belly cast bowl.
Made from a cast of the belly only, a belly cast bowl is more subtle than a full torso cast. It's less expensive to make because it doesn't require as much plaster impregnated gauze.
4. Cut strips of plaster in 12 to 18 inch long strips.
If you're planning to cast a detailed area, such as hands, cut some of the strips shorter and lengthwise so they are narrow and easier to place accurately to show smaller details.
5. Prepare and protect the expectant mom's skin.
The expectant mom should get in position for the cast. Hands go on her belly if you're going to include them in the cast.
Belly casting turns out best when done on bare skin, which is why the expectant mom needs to be very comfortable with the person who is making the cast.
Any area of the expectant mom's skin that will be cast must be covered in a generous layer of petroleum jelly so the dried cast doesn't stick to her skin.
6. Begin making the belly cast.
Dip the plaster gauze in water and then place it across the area to be cast.
Smooth the strips carefully to get a true shape and as much detail as possible.
Use narrow strips for detailed areas such as hands.
You will need to create several layers of gauze in order to ensure the cast is sturdy.
7. Ensure the shape is flattering.
If you're casting the mother's full torso, you'll get a better shape if you ensure the mom sits or stands with very good posture.
If you are not casting hands, the mom can put her arms up in the air (if this is comfortable for her) while the breasts are being cast to ensure the cast takes on a more flattering shape.
When placing gauze on the chest, start and the bottom and smooth upward so you're pulling everything up. Avoid starting from the top of the chest with the gauze and smoothing down if you are worried about ending up with a droopy look.
8. Wait for the cast to set.
It usually takes about 20 to 30 minutes for the cast to set.
You'll know when the cast is ready because it will be firm and start to separate fairly easily from the body.
9. Remove and clean the cast.
Once the cast is set, remove it carefully.
Use paper towels to gently wipe the petroleum jelly from the inside of the belly cast.
Fill the inside cavity of the belly cast with crumpled newspapers to support the weight of the cast and lay the cast belly side up.
Let the cast set for at least three days.
10. Smooth and finish the cast.
Trim any rough edges from the cast to form a pleasing final shape.
For a smoother look, lightly sand the belly cast with sandpaper, wipe it clean with a dry cloth and coat the cast with gesso.
11. Decorate your belly cast.
Decorating your belly cast is up to you and only limited by your imagination.
I wanted a simple, subtle look, so I painted it just a couple of shades darker than the nursery, but you can add sequins, feathers, ribbons, family photos or any other decorative elements you like to your belly cast.
I simply set my belly cast on a clear shelf with a little blu-tack on the bottom to keep it from sliding.
If you'd like to add a ribbon to hang your belly cast, use a hand drill, or by hand, push a drill bit through the belly cast in the places where you want to attach the ribbon. Thread the ribbon through the holes, tie an attractive bow and hang your belly cast.


New! Comments
Have your say about what you just read! Leave me a comment in the box below.